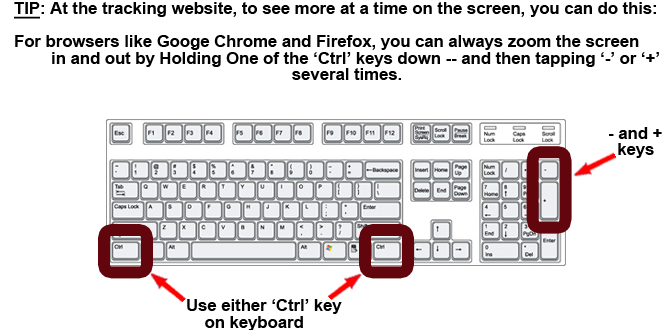
Click on any Light Blue text to jump to the answer below on the page
Common Questions
Vehicle Location – Where is vehicle now ? And where has it been today (Breadcrumb Trail) ?
Alerts – Set up an alert quickly
Alerts – Sending an alert to a cell phone
Speed Gauge – How to see recent Posted Speed Limit violations
Starter Disable/ Enable – Straight forward steps to do it
Change the Name of the Vehicle that appears on the map
Table of Contents
Dashboard Menu Option
Left 1/3 of screen (a grey box)
Overview of Grey box
Group Name
Date and Time
Globe in upper right corner of box
Vehicle
Driver
Landmark
Count in lower right corner of box
Following screen after you click on Vehicle, Driver or Landmark:
Group Settings
Overview
Group Name
Time Settings
Hours of Operation
Vehicle
Overview
Square check box
Trash Can
Edit (Pencil)
Globe
Driver
Overview
General
Contact Information
License/Insurance
Landmark
Overview
Permissions
Overview
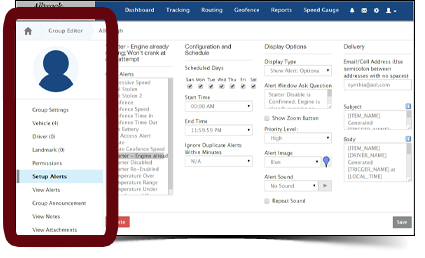
Setup Alerts
Overview
Select a Trigger
Configuration and Schedule
Display Options
Delivery
View Alerts
Overview
Group Announcement
Overview
View Notes
Overview
View Attachments
Overview
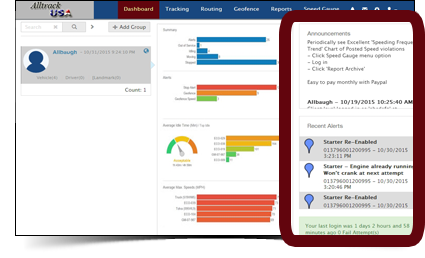
Center 1/3 of screen
Overview
Summary
Average Idle Time (Min)
Average Max. Speeds (MPH)
Right 1/3 of screen
Announcements
Recent Alerts
Last Login
Speed Gauge Menu Option
Overview
Login Screen
Report settings
Manage Users
Report Archive
Vehicle List
Contents
Top Questions
Vehicle Location – Where is vehicle now ? And where has it been today (Breadcrumb Trail) ?
Where is it now ?Go to our tracking website at: track.alltrackusa.com
(For full privacy and security, you’ll be redirected to our High Security, Encrypted SSL Server site at https://track.alltrackusa.com)
NOTE: There’s also a regular non-http: tracking website at track2.alltrackusa.com Log in with your Username & Password
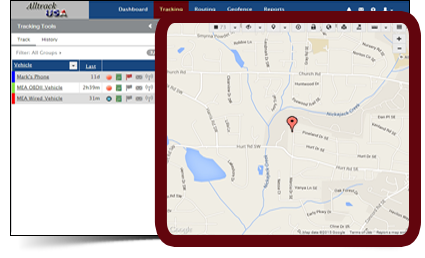
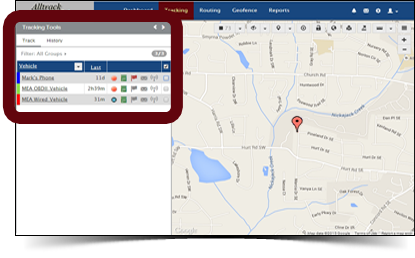
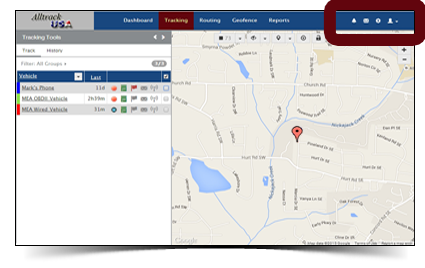
Click on ‘Tracking’ on the top menu. The map on the right shows where the vehicle is right now.
If you have more than 1 vehicle: On the left there’s a row for your vehicles. Each row has a square checkbox icon. Check it to see that vehicle on the map or not.
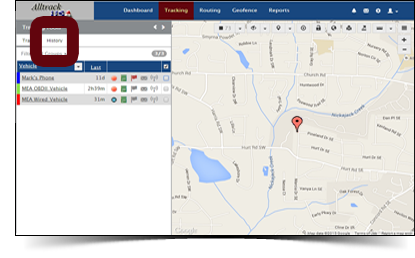
Click on ‘Tracking’ on the top menu.
On the left there will be ‘Track’ and ‘History’. Click on ‘History’.
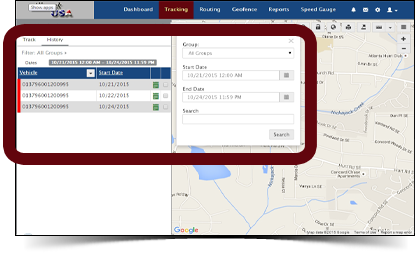
Click on the Grey Date Range shown to see a popup.
Change the date range to the days you’re interested in seeing.
Click ‘Search’ in the lower right corner of the pop up.
One the left, each row is for 1 day’s travels. The date is listed.
IMPORTANT: Click on the checkbox next to ‘Start Date’ to show the History of that day’s travels on the map.
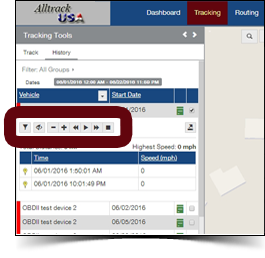
Your can see Animation of a vehicle’s travels for a day. After you’ve clicked a checkbox for a day, symbols appear for Animation.
You can place the cursor on each symbol to see what it does. You’ll probably just use ‘Play’ and ‘Stop’.
Alerts – Set up an alert quickly
Select ‘Dashboard’ at the menu at topIn grey box on left, click on the group name to the left of the date/time (This is probably your last name).
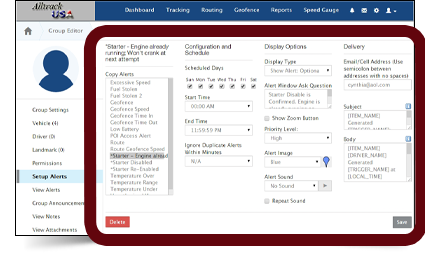
Click ‘Setup Alerts’
Click on the desired one in the column ‘Select a Trigger’
In the next column to the right under ‘Configuration and Schedule’, this is when the alert is to be active. Usually every day of week is checked marked. And every minute of the day is set: 00:00 AM – 11:59:59 PM.
Skip the next ‘Display Options’ column
In the next ‘Delivery’ column, enter your email address or cell phone address. You can enter multiple addresses — Just put a semi-colon between each one (“;” – withOut the quotes).
NOTE: The box is small so you can just see the first address, if there are several. You can place the cursor in the box and scroll to the right to see the rest. Scrolling to done with the right and left arrow keys.
(More info on cell phone addresses is just below at ‘Alerts – Sending an alert to a cell phone’)
In the lower right, click ‘Save’ More details on setting up alerts can be found in this document HERE
Alerts – Sending an alert to a cell phone
An alert can be sent to an Email and Cell phone.
Sending it to a cell phone is similar to sending it to an email address. You use the same ‘Delivery’ column as in the section above. But instead of an email address, you put the cell phone address.
An email address is, for example, ‘tom@abc.com’. A cell phone address is the same format, for example, ‘123456789@abc.com’.
The first part is your cell phone number. And the last part is your cellular provider.
Here are common cell provider formats (Replace ‘cellnumber’ with your cellular phone #):
Sprint = cellnumber@messaging.sprintpcs.com
AT&T = cellnumber@txt.att.net
Verizon = cellnumber@vtext.com
T-Mobile = cellnumber@tmomail.net
Tracfone = cellnumber@vtext.com
Virgin Mobile = cellnumber@vmobl.com
US Cellular = cellnumber@email.uscc.net
Nextel = cellnumber@messaging.nextel.com
Boost = cellnumber@myboostmobile.com
Alltel = cellnumber@message.alltel.com
You can easily test if you have the correct address by using a PC to send a message to your phone.
For example, if you use Verizon cell service and your cell phone # is 5551234567, this is your cell phone’s address: 5551234567@vtext.com. Use your PC email software to send a message to this address just like it was an regular email address. In the body of the email you could enter something like ‘test…..’.
For more information, contact your cell phone provider.
And a good Google search for info = ‘Email Text Messages to cell phone’
You can also contact us for help. Email us at techsupport@alltrackusa.com
Speed Gauge – How to see recent Posted Speed Limit violations
Click on ‘Speed Gauge’ on the top menu.Log in –You should have an email from Speed Gauge with the password used here. Enter your email address and the password here.
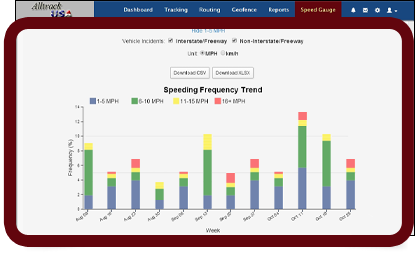
Click on ‘Speeding Frequency Trend’. This is an Excellent Graph !! It shows you how often the vehicle sped and by how much.
You can see this for ‘Interstate/Freeway’, Non-Interstate/Freeway’ or Both. You can select this just above the chart on the screen where it says ‘Vehicle Incidents’. Check the boxes of what data you’d like to see.
You can see this for the last 12 Weeks or Last 12 Months. The upper left corner has an option for ’12w’ and ’12m’.
You can put the cursor on any color of the graph to see details about this segment.
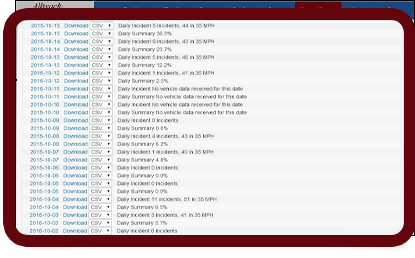
Lower part of screen:
For details about a specific day, see the lower part of the screen. Here you can click on any the date to see details about where violations occurred.
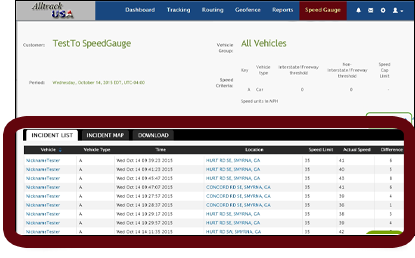
All speeding violations that occurred that day are listed by street address.
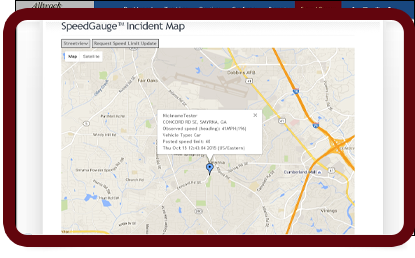
Clicking on any street address of a violation will show you a map on the screen.
Starter Disable/ Enable – Straight forward steps to do it
Note: This is an Optional feature that’s available with the ‘Wired’ device. Our relay is installed on your vehicle and your account is set up for the feature to be available.
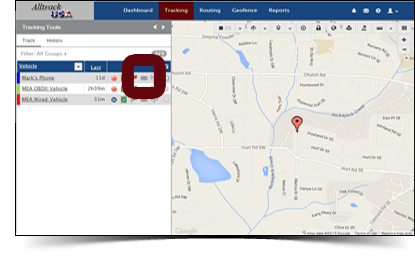
Click on ‘Tracking’ on the top menu. The map should be where the vehicle is right now.
On the left there’s a row for your vehicle(s). Click on the ‘Envelope’ to send a message to the device.
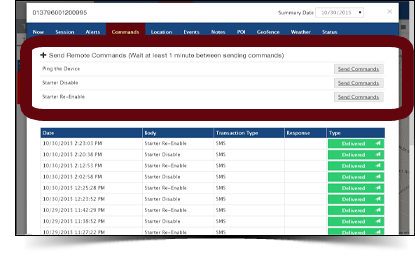
To see the available commands to send, click on this text: ‘+ Send Remote Commands (Wait at least 1 minute between sending commands)’
Next to the command you’d like to send, click the button ‘Send Commands’. Only 1 command can be executed per minute. So if you’d like to send another, wait at least 1 minute.
Close the white popup by clicking the ‘X’ in the upper right corner.
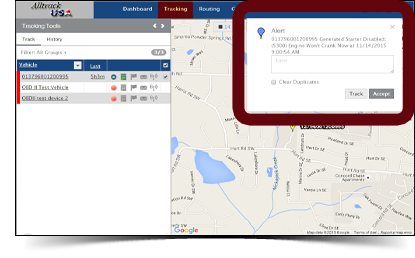
You’ll receive confirmation that the command happened with a pop-up in the upper right corner telling you this. This means that the device should be sending a ground (through the yellow wire) to energize the relay to disable the starter.
At the popup, click ‘Accept’.
To Re-Enable the Starter:
Click on the ‘Envelope’ to send communicate with and send a message to the device.
To see the available commands to send, click on this text:
‘+ Send Remote Commands (Wait at least 1 minute between sending commands)’
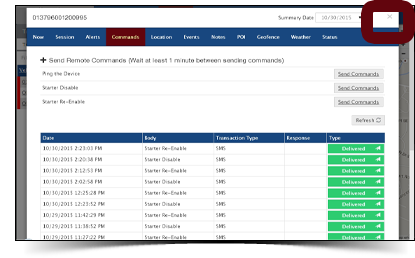
Next to the command ‘Starter Re-Enable’, click the button ‘Send Commands’.
Close the white popup by clicking the ‘X’ in the upper right corner.
In the upper right corner, a popup should appear saying that the Starter is Re-Enabled.
At the popup, click ‘Accept’.
Dashboard Menu Option
Left 1/3 of screen (a grey box)
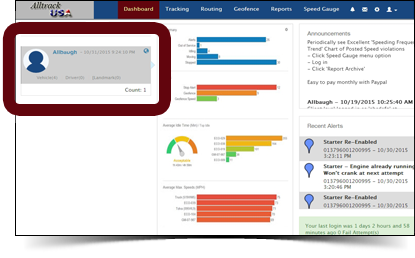
Overview of Grey box
The grey box on the left 1/3 of the screen is a summary of all of your vehicle(s) being tracked (You probably have just 1 here).
This is where you go for managing your vehicle settings, options and Alerts.
Below is a breakdown of what everything is:
Group Name
This is where your ‘Group’ of vehicles being tracked is listed, although you probably are just tracking 1 vehicle. So you just have 1 vehicle in your ‘Group’
This is usually your last name.
You can click on this name to go to Group options that can be set.
Date and Time
This is the current day and time for your selected time zone.
If the time zone is incorrect and needs to be changed:
Click on the Group name just to the left of the time (it’s probably your last name)
‘Time Settings’
‘Time Zone’
When done editing, click ‘Save’ in the lower right.
Globe in upper right corner of box
Clicking this is the same as clicking the ‘Tracking’ menu option at the top of the screen. It gives you a map with the current vehicle location.
Vehicle
Clicking this takes you to the next section ‘Group Settings’ with ‘Vehicle’ already highlighted.
Driver
Clicking this takes you to the next section ‘Group Settings’ with ‘Driver’ already highlighted.
Landmark
Clicking this takes you to the next section ‘Group Settings’ with ‘Landmark’ already highlighted.
Count in lower right corner of box
This is the number of vehicles being tracked in the your account (and in this group).
Following screen after you click on Vehicle, Driver or Landmark:
Round, blue icon representing a person
You can put a picture here if you’d like. This is normally a picture of a person’s face which represents the group.
Click on the round icon and there are 2 options:
“Change Picture”
“Remove Picture”
Group Settings
Overview
This is group information including your Group ‘Name’, ‘Time Settings’ and ‘Hours of Operation’ (Hours that vehicle is allowed to be in use).
Below is a breakdown of what everything is:
Group Name
Supervisor NameDescription
Time Settings
Time ZoneUnit of Measure
Volume Measurement
Temperature Measurement Unit
Country
Use Daylight Savings time check box
Hours of Operation
Week DaysUsually every day of week is checked marked
Hours
Usually every minute of the day: 00:00 AM – 11:59:59 PM
Save positional records during Hours of Operations Only
I’d recommend NOT checking this
Vehicle
Overview
Here you can see all of the vehicle(s) in your group and edit details about each of them such as make, model and VIN #.
Below is a breakdown of what everything is:
Square check box
This isn’t used much. If you have several devices and want to do something for more than one of them at a time, like Delete them, you could check this box for each one and delete them in 1 step; instead of individually one by one.
Trash Can
This little red trash can is to throw away/ delete a vehicle in the tracking system.
If you click it, you’ll be asked to confirm this by checking a box called ‘Confirm Action’. Then click the ‘Confirm’ box.
Edit (Pencil)
This it Edit vehicle information. Vehicle Name and Speed Gauge being check marked are the only important things here.
Vehicle Detail
Vehicle Name
This is important to enter. It’s the Vehicle Name used in the system to identify what the vehicle is called.
VIN
Vehicle Identification Number
Description
Description of vehicle.
Year
Vehicle year
Make
Vehicle make such as Lexus, Chevrolet, Cadillac, etc.
Model
Vehicle model such as Inifinty, Escalade, Camaro, etc.
Color
On the Tracking screen, to the left is your Vehicle Name. Left of this name is a colored band to identify the group it belongs to. You’ll normally have just 1 group with 1 vehicle.
Here you select this color for the group of vehicle(s) on the Tracking screen.
Click on the colored box and a range of colors is given. You can drag the ‘+’ symbol in the box around for a desired color. The vertical color band on the right can be dragged up and down for different color ranges.
This menu option is mainly for fleets of vehicles where different groups of vehicles are given different colors do distinguish them from each other.
Enable Speed Gauge
This is to enable the DOT Posted Speed Limit feature. The dropdown menu with it has the options of ‘Car’, ‘Truck’ or ‘Hazmat’. ‘Car’ is the normal selection.
Tabs at left of screen
Engine
Fuel
Other
Customer Defined
Driver
Except for the first few items (‘Icon’ and ‘History Trace Color’) Do Not Touch any settings here. These settings affect the proper operation of the device that’s in the vehicle. Icon
You can change this if you’d like. It’s the icon seen on the maps for your vehicle.
History Trace Color
You can change this if you’d like. It’s the color of the line seen on ‘History’ maps for your vehicle’s travels.
Hardware Profile
Don’t change this. It’s your tracking equipment’s name
Port
This can’t be changed. It’s a communication setting for your tracking equipment.
Protocol
This can’t be changed. It’s a communication setting for your tracking equipment.
IMEI/Serial #
Don’t change this. It’s your tracking equipment’s serial #.
Username
This field isn’t used by the system. It’s so you can keep track of this information.
Password
This field isn’t used by the system. It’s so you can keep track of this information.
SMS Phone Number
This field isn’t used by the system. It’s so you can keep track of this information.
Device Static IP
This field isn’t used by the system. It’s so you can keep track of this information.
Reporting Frequency (Seconds)
This field isn’t used by the system. It’s so you can keep track of this information.
Device Model
This field isn’t used by the system. It’s so you can keep track of this information.
Status
This field isn’t used by the system. It’s so you can keep track of this information.
Check box for ‘Out of Service’
Don’t change this. It marks your account as being not used. Setup Alerts
I’d recommend NOT USING THIS. These are alerts by vehicle. Below, there’s a better place to set up Alerts for the whole Group, even if it is just 1 vehicle. Go down 4 sections to ‘Setup Alerts’ for info. The menu options to use at the tracking site are: ‘Dashboard’, Group Name (usually your name) in grey box on left, ‘Setup Alerts’. Click HERE for info for setting up alerts at that location. View Alerts Maintenance Schedule Maintenance History
Globe
Clicking this is the same as clicking the ‘Tracking’ menu option at the top of the screen. It gives you a map with the current vehicle location.
Driver
Overview
Not Used – This section is for fleets with many drivers using the multiple vehicles.
General
Not Used
Contact Information
Not Used
License/Insurance
Not Used
Landmark
Overview
This is not used much. You’ll probably use Geofences to accomplish the same thing.
‘Landmark’ and ‘Point of Interest’ are the same thing. ‘Point of Interest’ can also be called ‘POI’.
This is an object or feature of a landscape or town that is easily seen and recognized from a distance, especially one that enables someone to establish their location.
Permissions
Overview
You shouldn’t need to touch this. This assigns users who can use the system.
Setup Alerts
Overview
This is where Alerts should be set up. They’re created for the whole Group, even if it’s just 1 vehicle.
There are no alerts for ‘Posted Speed Limit’. You probably don’t want to receive a text message or email every time the driver goes over the speed limit. Instead, you’ll receive a Daily, Weekly or Monthly summary of when the driver exceeded the posted speed limit. This is selected in the ‘Speed Gauge’ section of this document HERE. You can receive immediate Posted Speed Limit alerts for an additional $1.99/month. Email us if you’re interested.
If an alert is created, a star ‘*’ will appear in front of the alert name in the ‘Select a Trigger’ column
Select a Trigger
This is what Triggers an alert.They’re listed here in alphabetical order. GeoFence
Geofence
Geofence Speed
Geofence Time In
Geofence Time Out
Ignition On/Off
Ignition turned Off
Ignition turned On
Main Power On
Main Power On
Power Lost
Primary Power Lost
Primary Power Re-Applied
Route
Route
Route Geofence Speed
Speed (This is NOT Posted Speed Alert)
Excessive Speed
Starter Disable/ Enable
Starter Disabled
Starter- Engine running; Won’t Start at next attempt
Starter Re-Enabled
Unauthorized Use
Unauthorized Vehicle Use
Configuration and Schedule
Threshold or Value (Only shown if pertinent to the alert)Scheduled Days
Start Time
End Time
Ignore Duplicate Alerts Within Minutes
Display Options
Display TypeAlert Window Ask Question
Show Zoom Button
Priority Level
Alert Image
Alert Sound
Repeat Sound
Delivery
Email/Cell Address. You can enter multiple addresses — Just put a semi-colon between each one (“;” – withOut the quotes).NOTE: The box is small so you can just see the first address, if there are several. You can place the cursor in the box and scroll to the right to see the rest. Scrolling to done with the right and left arrow keys.
If you’d like to send a text message to your cell phone and don’t know what the cell address is, click HERE for how to do that.
Subject BodyView Alerts
Overview
See all alerts that were generated for a day.
At the ‘Sessions’ text, there’s a drop down menu of Dates that alerts were created. Click on a date to see the alerts that were created on that date.
Group Announcement
Overview
You probaly won’t use this.
On the Dashboard in the upper right corner, there’s a box where Announcements go. This box here is where you can type information and reminders that you’d like to see in that box.
View Notes
Overview
You probably won’t use this.
This is to add and view simple notes for people who has access to this particular group.
View Attachments
Overview
You probably won’t use this.
Like ‘View Notes’ above, this is to add and view pictures & images for people who has access to this particular group.
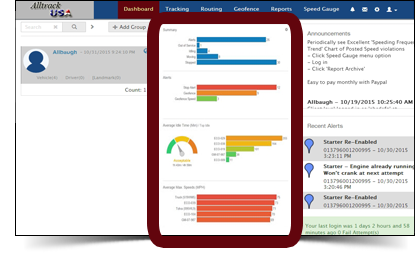
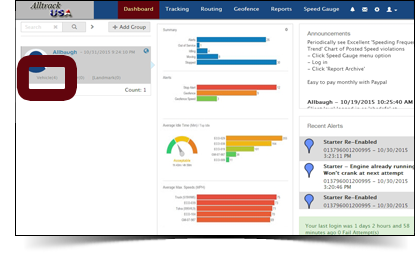
Center 1/3 of screen
Overview
This gives you a quick snapshot on what’s going on with the vehicle being driven. You can see things like excessive idling, speeds and alerts begin generated.
There’s a cog in the upper right corner. By clicking on this, you can select the 4 types of information shown in this column. These are the options: Summary, Idle Time, Speeds, Alerts, Low Battery & Fuel. You may select up to 4 of these to display. But since the last 2 aren’t used so I’d leave the 1st four check marked.
Summary
AlertsOut of Service
Idling
Moving
Stopped
Average Idle Time (Min) / Top Idle
Average Max. Speeds (MPH)
Right 1/3 of screen
Announcements
Messages from Alltrack USA are shown. And you can display information and reminders, too, with the menu options ‘Dashboard’, click on Group Name (probably your last name), ‘Group Announcement’.
Recent Alerts
Alerts that have taken place recently. If you click on any of the alerts, a pop up will come up with a list of all of the recent alerts by date.
Last Login
This is the last time you logged into the system.
If someone tried to log in and wasn’t allowed, it’ll show the # of Failed Attempts.
Tracking Menu Option
Overview
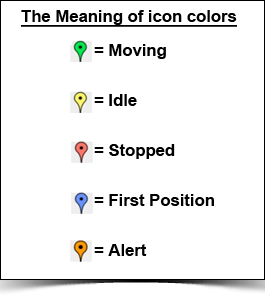
On map, these are the icon colors & what each represents:
Stopped = Red
First position = Blue
Moving = Green
Idle = Yellow
Alert = Orange
Tracking Tools (on left)
” < > ” symbols on grey bar TrackFilter: All Groups Vehicle row(s) with icons
Idle icon (Blue circle) or Stop icon (Stop sign) is shown
Session Info
Now = Current location details
Session = Device and trip details
Alerts = Recent alerts that have occurred
Commands = Not used. If device has the feature available and it’s installed on the vehicle, this is a way to send remote starter disable/enable commands to the vehicle.
Location = Recent vehicle locations
Events = Technical commands that device has recently reported in to the website.
Notes = Not used
POI (Point of Interest) = Rarely used. This is to create an interesting site to visit on the maps.
Geofence = This is to create a Geofence based on the vehicle’s current location. There’s also a ‘Geofence’ menu option at the top of the screen to work with Geofences.
Status = Technical communication info with the device in the vehicle. This includes raw data that has been received.
Round orange icons with an exclamation mark in them are completely normal to see.
Alerts
Commands
Ping (Not needed for this product)
To ‘Ping’ means to communicate with the device in the vehicle to request where it is. The ‘Real Time with History’ product calls in it’s location automatically when the ignition is turned on. So the ‘Ping’ feature is not needed.
The ‘Ping’ feature is used for products that do NOT call in automatically. With them, you manually ‘Ping’ them when you want to know where they are.
Although not normally needed, the ‘Ping’ feature is enabled if you would like to manually call the device & have it report it’s current location.
Check box
See the history of where a vehicle’s been over the past 3 months. You can search for 1 day or a range of days. Those day’s travels will be listed on the left. Click the check box to show each day’s travels on the map. I’d look at just 1 day’s travels at a time on the map or else it can get confusing with all of the lines drawn all over it. Filter: All Groups – Clicking on this text is the same as clicking on the next line, ‘Dates’. See info there.
Dates – Click on this text for a popup:
Groups – Just leave ‘All Groups’ selected
Start Date
End Date
Search Vehicle Row(s) with icons
Vehicle
Start Date
Session Info
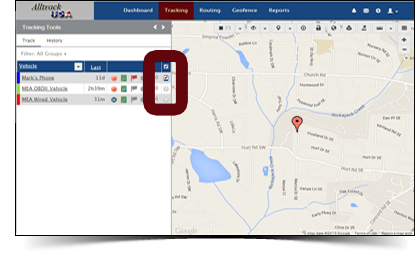
Check box – Check this to see the vehicle’s history on the map.
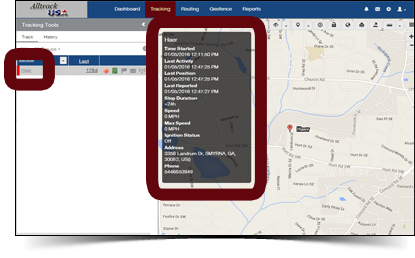
You can see a number of device details in a pop-up window if you put the cursor ON TOP of the vehicle’s name (shown here in the red box on the left side of the screen). You DON’T need to click on it; just put the cursor ON the vehicle name for a few seconds and the pop-up window will appear. You’ll be able to see these items:
Time Started
Last Activity
Last Position
Last Reported
Stop Duration
Speed
Max Speed
Ignition Status
Address
Phone
Map (on right)
Map icons at the top+/-
Zoom the map in and out.
Yellow man
Google Street View = Click left mouse button and drag man onto map and release button on any blue line (street). Google Street View will show surroundings. You can look around 360 degrees by putting mouse ‘hand’ on map, click left mouse button and drag left and right.
Map
View the Google map as a cartoon or as a Satellite aerial view.
Magnifying glass
Search for something on the map.
Countdown Timer
Number of seconds until the map refreshes with the current vehicle location. The refresh rate default is usually every 60 seconds.
(NOTE: This has nothing to do with how often the vehicle calls in its GPS Location & Speed, which is every 10, 20, 40 or 60 seconds.)
You can change this by clicking the down arrow next to the number. This change will last for the current session only. Next time you log into the tracking website, this number will go back to the default of 60 seconds.
If you’d like to permanently have the map update more frequently, email us at ‘techsupport@alltrackusa.com’ and let us know.
2 cars icon
Traffic view = See current traffic situation on map’s streets
Green= Good/ Fast
Orange= Ok/ Moderate
Red= Bad/ Slow
Hide labels
Show or Hide the name of the vehicle that’s next to the icon on the map.
The icon is an eye. Click on it to hide the icon. Click on it again and it appears.
Show Item Label Regardless of Zoom
Show POI
Show Points of Interest on the map.
Show Geofence
Show Geofences on map that you have defined.
Lock/Unlock map
If you want the page top spot refreshing while you search for something you click this button to lock it. When you’re done, unlock it by clicking on the icon again.
Save map view
Print Map
Print the current map along with details about it’s location.
Export KML
Export current map as a ‘KML’ file. KML is an internationally recognized file format used to display geographic data in a mapping application, such as Google Maps for mobile. You can create KML files to pinpoint locations, add image overlays, and expose rich data in new ways.
Show Ruler
Show Latitude/Longitude on the map of where the cursor is.
Measure Distance & Measure Area
Click on multiple places on map to measure distance and area.
Routing Menu Option
Overview
This is mainly for Fleet owners. It’s used if you have several vehicles out in the field and need to direct one to a location. You can find the closest vehicle to that location; and determine the best route for them to get there.
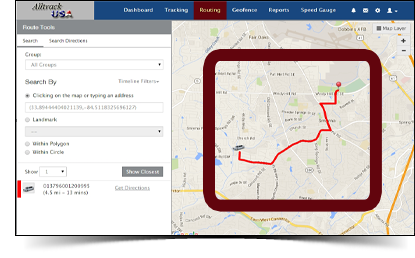
Search
If you click anywhere on the map it will pick out three of the closest devices in a specific group or all of the groups, depending on what you’re searching for.
Under the check box “Clicking on the map or typing an address” you will see that the latitude and longitude will automatically populate.
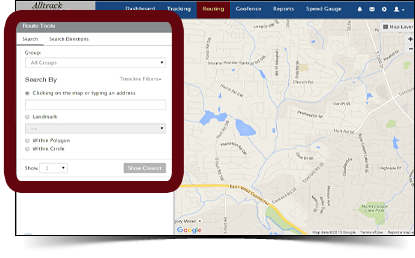
You can also search for a location for POI. If you have added POI’s (Points of Interest) then you can click on the drop down box and it will give you the location.
If you are trying to find the closest devices to a POI then you can click one of the options “Within Polygon” and “Within Circle”. This is allow you to draw one of these shapes on the map and find the devices in that range.
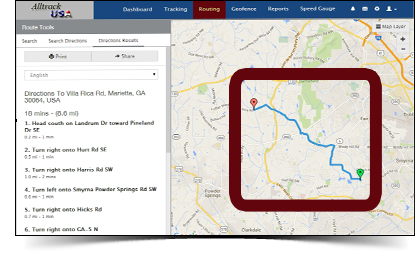
Search Directions
Here you can choose a start and end location anywhere on the map and get turn by turn directions.
Geofence Menu Option
Overview
A Geofence is virtual perimeter for a real-world geographic area and can be any shape and size. It’s common to use them around home, school and work so you know when your teen driver enters and exits these areas.
You can optionally set up alerts so you’re notified in Real Time if they enter and exit these areas. Otherwise you can run a report later to see when this happened.
These are the steps in using Geofences
1) Create a Geofence
2) Assign it to a vehicle
3) Optional: Set up alerts to be notified in Real Time if the vehicle enter and exit.
Search
Clean
Draw
Layers
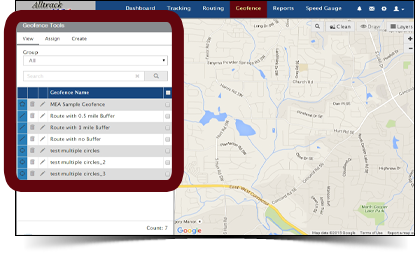
View
Leave ‘Group’ set to ‘All’ to see all of your Geofences that you have created.Your Geofences are listed. Each one is a row that has this information in it:
One of 3 symbols showing which type of Geofence it is:
A Circle
A Polygon
A Diagonal line is a Route
Trash Can
This little red trash can is to throw away/ delete a Geofence in the tracking system.
Edit (Pencil) – This is to edit a Geofence
Geofence Name
Description
Route Buffer
Border Color
Fill Color
Image
Geofence Group – Just leave the default group name there.
Name of Geofence
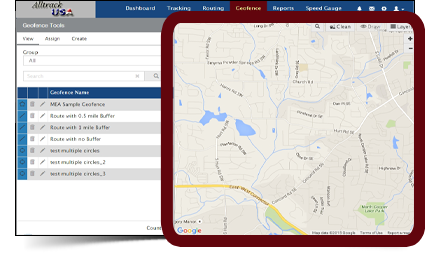
Square check box – Check the boxes of the Geofences that you’d like to see on the map on the right. IMPORTANT: After checking a box, in the upper right corner of the map click ‘Draw’. This will actually show the Geofence on the map.
Assign
Group – Leave ‘All’ Groups selectedSearch – Not used. Only used if have many Geofences to search through. Your Geofences are listed. Each one is a row that has a Gear/Cog to the right of the name.
Cog – Click on this Gear/Cog to work with all assigned Geofences for the vehicle.
Assigned Geofences popup
All assigned Geofences are shown:
Each row is an assigned Geofence for the vehicle.
Garbage Can – Delete assignment
Pencil – Edit assignment
Action – In/Out/Both/None
Start Time – Usually 12:00 AM
End Time – Usually 11:59:59 PM
Min Speed
Max Speed
Sun-Sat – Days assignment is active
Assign Geofences button in upper right corner:
Available Geofences to assign are shown.
Click the check box, edit the information and click ‘Save’
Action – In/Out/Both/None
Start Time – Usually 12:00 AM
End Time – Usually 11:59:59 PM
Min Speed
Max Speed
Sun-Sat – Days assignment is active
Create
CircleFirst, have the desired Geofence area on the map. You can zoom in/out and drag map left/right/up/down by putting mouse icon on screen, press left mouse button and drag map around. If you know the Latitude & Longitude
Enter Latitude & Longitude
Select Search
This is center of map If you know the street address
Enter address
Select Search
This is center of map Once you have the desired Geofence area on the map:
There are 2 ways to create Circular Geofences:
(1) Freestyle
(2) If you know radius from center
Have desired Geofence are on map. You can zoom in/out and drag map left/right/up/down by putting mouse icon on screen, press left mouse button and drag map around.
On map, Left click mouse where the center of desired Geofence should be.
Left click mouse anywhere to define the outer edge of the circle
(If you make a mistake, you can click inside the circle to make it smaller)
When you’re happy, click ‘Save’
At this popup, you’ll usually just enter a Geofence Name and click ‘Save’. But here’s a description of all of the options:
Geofence Name
Description
Create Multiple Gefences
This is if you want to create 1 or 2 additional Geofences with the same center but different radiuses. You can always do this manually, but this is a quick way to create a few more now.
The additional Geofences will have the same name but have ‘_1’ and ‘_2’ at the end of them.
Circle
Circle 1
Circle 2
Border Color
Fill Color
Image
Geofence Group – Just leave the default group name there (It’s probably your last name).
Check box ‘Assign this Geofence to Vehicle(s)’. This is a quick, immediate way to assign this new Geofence to your Vehicle(s). I would check the box. It’s the same as using the ‘Assign’ tab in between ‘View’ and ‘Create’ on the previous screen.
Action
In
Out
Both
Nope
Time In (min)
Time Out (min)
Min Speed (mph)
Max Speed (mph)
Days Time
Start Time
End Time
When you’re happy, click ‘Save’. (2) If you know radius from center
Have desired Geofence are on map. You can zoom in/out and drag map left/right/up/down by putting mouse icon on screen, press left mouse button and drag map around.
On map, Left click mouse where the center of desired Geofence should be.
In the box next to ‘mi’ for miles, enter radius you’d like to use and click ‘Draw’.
(If you make a mistake, you change the number and click ‘Draw’)
Click ‘Draw’ next to where you enter miles.
When you’re happy, click ‘Save’
At this popup, you’ll usually just enter a Geofence Name and click ‘Save’. But here’s a description of all of the options:
Geofence Name
Description
Create Multiple Gefences
This is if you want to create 1 or 2 additional Geofences with the same center but different radiuses. You can always do this manually, but this is a quick way to create a few more now.
The additional Geofences will have the same name but have ‘_1’ and ‘_2’ at the end of them.
Circle
Circle 1
Circle 2
Border Color
Fill Color
Image
Geofence Group – Just leave the default group name there (It’s probably your last name).
Check box ‘Assign this Geofence to Vehicle(s)’. This is a quick, immediate way to assign this new Geofence to your Vehicle(s). I would check the box. It’s the same as using the ‘Assign’ tab in between ‘View’ and ‘Create’ on the previous screen.
Action
In
Out
Both
Nope
Time In (min)
Time Out (min)
Min Speed (mph)
Max Speed (mph)
Days Time
Start Time
End Time
When you’re happy, click ‘Save’. Polygon
First, have the desired Geofence area on the map. You can zoom in/out and drag map left/right/up/down by putting mouse icon on screen, press left mouse button and drag map around. If you know the Latitude & Longitude
Enter Latitude & Longitude
Select Search
This is center of map If you know the street address
Enter address
Select Search
This is center of map Once you have the desired Geofence area on the map:
On map, Left click mouse on one corner of the desired Geofence.
Move the mouse to another corner and Left click mouse again.
Repeat this to make any shape you’e like.
At the last corner, double-click the mouse.
If you make a mistake, you can click ‘Undo’
When you’re happy, click ‘Save’. A popup will appear.
At this popup, you’ll usually just enter a Geofence Name and click ‘Save’. But here’s a description of all of the options:
Geofence Name
Description
Border Color
Fill Color
Image
Geofence Group – Just leave the default group name there (It’s probably your last name).
Check box ‘Assign this Geofence to Vehicle(s)’. This is a quick, immediate way to assign this new Geofence to your Vehicle(s). I would check the box. It’s the same as using the ‘Assign’ tab in between ‘View’ and ‘Create’ on the previous screen.
Action
In
Out
Both
Nope
Time In (min)
Time Out (min)
Min Speed (mph)
Max Speed (mph)
Days Time
Start Time
End Time
When you’re happy, click ‘Save’. Route
First, have the desired Geofence area on the map. You can zoom in/out and drag map left/right/up/down by putting mouse icon on screen, press left mouse button and drag map around. If you know the Latitude & Longitude
Enter Latitude & Longitude
Select Search
This is center of map If you know the street address
Enter address
Select Search
This is center of map Once you have the desired Geofence area on the map:
On map, Left click mouse on one corner of the desired Geofence.
Move the mouse to another corner and Left click mouse again.
Repeat this to make any shape you’e like.
At the last corner, double-click the mouse.
If you make a mistake, you can click ‘Undo’
When you’re happy, click ‘Save’. A popup will appear.
At this popup, you’ll usually just enter a Geofence Name and click ‘Save’. But here’s a description of all of the options:
Geofence Name
Description
Route Buffer
Border Color
Fill Color
Image
Geofence Group – Just leave the default group name there (It’s probably your last name).
Check box ‘Assign this Geofence to Vehicle(s)’. This is a quick, immediate way to assign this new Geofence to your Vehicle(s). I would check the box. It’s the same as using the ‘Assign’ tab in between ‘View’ and ‘Create’ on the previous screen.
Action
In
Out
Both
Nope
Time In (min)
Time Out (min)
Min Speed (mph)
Max Speed (mph)
Days Time
Start Time
End Time
When you’re happy, click ‘Save’.
Now that Geofence is created and assigned, you can optionally set up an alert to be notified in Real Time if the vehicle enters or exits it. Click HERE to go to that ‘Setup Alerts’ section of this document.
Reports Menu Option
Overview
There are about 25 reports available. After you click the ‘Reports’ menu option, the top left corner shows ‘My Reports’ and ‘Report Templates’. Click on ‘Report Templates’ to see all of the available reports. Once a report is created you save it and run it in the future. When you’re done creating a report, you’re asked to give it a name. Make something up that will help you know what the report is all about.You can create many variations of each report and give each a slightly different name. For example, here’s the same basic report saved in 4 different variations. Each can be run any time:
Mileage by State – Monthly – Chart form
Mileage by State – Weekly – Chart form
Mileage by State – Monthly – Grid form
Mileage by State – Weekly – Grid form
My Reports
These are reports that you’ve saved from the available ‘Report Templates’.Report Templates
These are all available reports. When you use a template, at the end you give it a report name that means something to you.Speed Gauge Menu Option
Overview
Speed Gauge is our ‘sister’ company that handles the DOT Posted Speed Monitoring.
Here you can see if the driver exceeded the DOT (US Department of Transportation) Posted Speed Limits. You can see WHEN speeding took place & WHERE it took place.And when they drove, what % of the time they were speeding. ***** A Fantastic Tool ****** is the ‘Speeding Frequency Trend’ chart. See below for how to view that. You can have a Report of DOT Speeding incidents emailed to you daily, weekly or monthly. And you can have a Weekly Summary Report of DOT Speeding incidents emailed to you, too. This ‘Speed Gauge’ menu option is used to turn these reports On & Off. This can be done with the menu options ‘Report Settings’ & then ‘Report Subscription Settings’. You probably don’t want to receive alerts every time your teen goes over the DOT speed limit. That’s why you receive a report the next morning. If you must, you can receive immediate DOT Posted Speed Limit alerts for an additional $1.99/month. Email us if you’re interested.
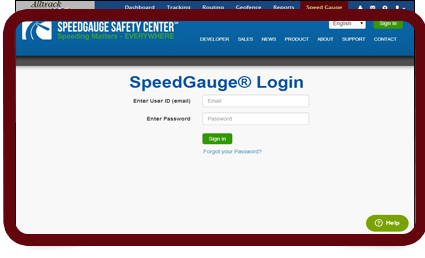
Login Screen
You should have an email from Speed Gauge with the password used here. Enter your email address and the password here.
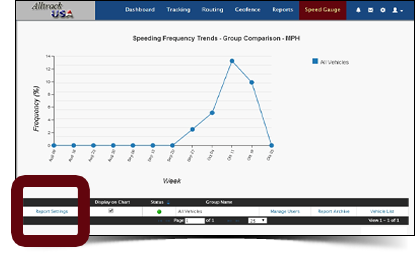
Report settings
You should rarely use this menu option. It’s to change settings for the Posted Speed Limit alerts & reports.
The only things you’ll probably ever work with here are ‘Group Emails’ & ‘Report Subscription Settings’.
Report Emails, one per line
Report retention period
Units for fleet speeds
Maximum speed, above which crumbs are ignored
Time Zone
Default Vehicle Type (use Vehicle List page to modify individual vehicles)
Car: interstate/freeway speed threshold
Car: non-interstate/freeway speed threshold
Car: max speed cap
Truck: interstate/freeway speed threshold
Truck: non-interstate/freeway speed threshold
Truck: max speed cap
HazMat: interstate/freeway speed threshold
HazMat: non-interstate/freeway speed threshold
HazMat: max speed cap
School Bus: interstate/freeway speed threshold
School Bus: non-interstate/freeway speed threshold
School Bus: max speed cap
Incident Filter Interval (applies to incidents on same road)
Report Subscription Settings: (Select your reports and frequency)
Display Distance Driven on reports?
Attach CSV Report to Email
Group Status
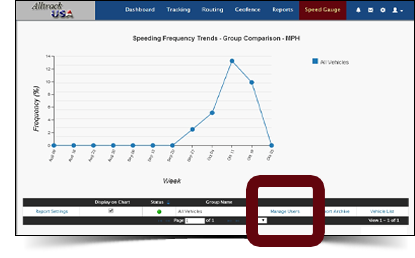
Manage Users
This is not used.
Report Archive
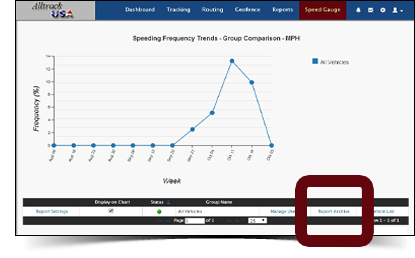
***** This is a very important menu option !! ****** It allows you to see history of speeding in chart form.
A Fantastic Tool is the ‘Speeding Frequency Trend’ chart.
All Charts
The following 2 charts are shown in small form here.
Speeding Frequency Trend
This is an Excellent Graph !! It shows you how often the vehicle sped and by how much.
You can see this for ‘Interstate/Freeway’, Non-Interstate/Freeway’ or Both. You can select this just above the chart on the screen where it says ‘Vehicle Incidents’. Check the boxes of what data you’d like to see.
You can see this for the last 12 Weeks or Last 12 Months. The upper left corner has an option for ’12w’ and ’12m’.
You can put the cursor on any color of the graph to see details about this segment.
Speeding by Vehicle
A chart shows you the percentage of time the vehicle was speeding. You can see this for the last Month or Last Week. The upper left corner has an option for ‘Last Week’ and ‘Last Month’.
Lower part of screen:
For details about a specific day, see the lower part of the screen. Here you can click on any the date to see details about where violations occurred.
(Note: This information can be emailed to you automatically with the menu options ‘Report Settings’; Then enter email address in ‘Report Emails, one per line’ & select when to receive reports with ‘Report Subscription Settings’.)
All speeding violations that occurred that day are listed by street address.
Clicking on any street address of a violation will show you a map on the screen.
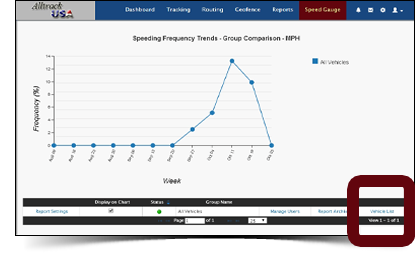
Vehicle List
This is a list of your vehicle(s)
4 icons in top right corner
Bell icon
User Alerts
Envelope icon
Messaging Center
Cog icon
Help and SupportThis sends an email to technicians if you have a question or need help. Favorites
This is not used much. It’s to open an internet web page/URL within the application, like an internet browser does.
In the upper right corner, click ‘Add New Link’ to enter the URL you’d like to go to. Commands
This is to remotely Disable & Re-Enable the vehicle starter, if you have that option installed on the vehicle.
If you have several devices: In the upper right corner at ‘Item:’ a drop down lets you select the vehicle you’d like to send a command to.
Next to the command you’d like to send, click the button ‘Send’. Only 1 command can be executed per minute. So if you’d like to send another, wait at least 1 minute.
You’ll receive confirmation that the command happened with a pop-up in the upper right corner telling you this.
Silhoutte icon
Change PasswordNew Password
Confirm Password
Entering this again will confirm that you entered it the way you thought you did above.
Click ‘Change Password’ button. If you didn’t enter the password exactly the same both time above, the password won’t change. Logout
This is the proper way to exit the system. Always use this whey you’re done and would like to logout.
Using a Cell Phone for Tracking
Overview
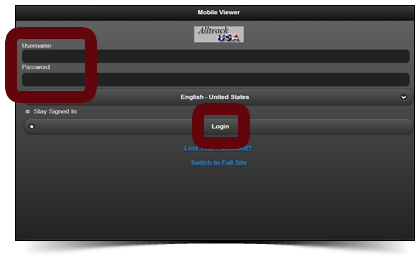
On a cell phone with internet access, go to the tracking website at
https://track.alltrackusa.com/mob
(The ‘mob’ at the end is short for ‘Mobile’ tracking)
NOTE: There’s also a regular, Non-Encrypted SSL tracking website at track2.alltrackusa.com/mob
Log in using the same Username & Password that you use for the main website (https://track.alltrackusa.com and track2.alltrackusa.com).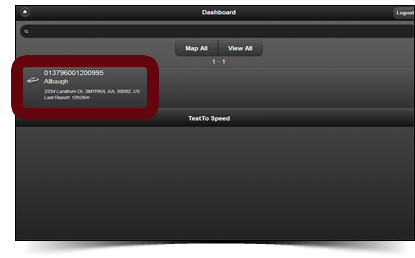
Your device(s) being tracked will be listed. Click on one.
This is the main ‘Home’ screen.
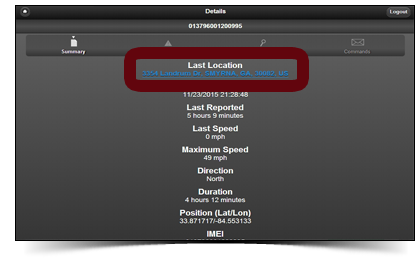
Click on the address under ‘Last Location’ to see a map of where the vehicle is right now.
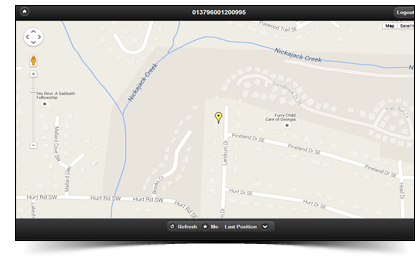
The map shows where the vehicle is now.
Zoom In / Out = On the left, you can zoom in and out of the map.
Google Street View = You can drag the little yellow man onto streets on the map to see a virtual 360 degree of the surroundings as though you were standing on the road looking around. Note that Google Street View is available for most but not all US Roads. If available, when the little yellow man is on the map, the street will have a blue line on it to show it has Street View available for it.
Refresh = At the bottom, this refreshes the map
Me = Shows a round green icon of where you are. This is so you can see where you are in relation to the vehicle.
Last Location = The little down arrow lets you select how many recent locations you’d like to see as to where the vehicle’s been. You can select ‘Last Location’, ‘Last 2’, 3, 4, 5, 10, 15, 25, 50 or 100 locations.
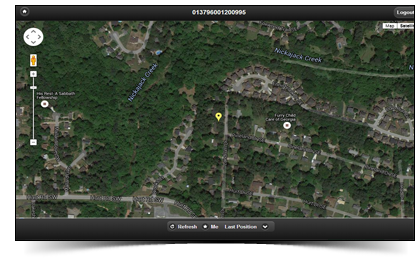
You can see a satellite view of the same map by clicking the ‘Satellite’ button at the upper right corner.
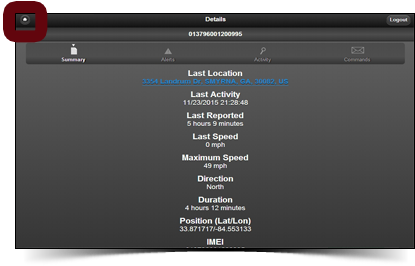
The icon in the upper left corner is ‘Home’. It’s an icon of a house.
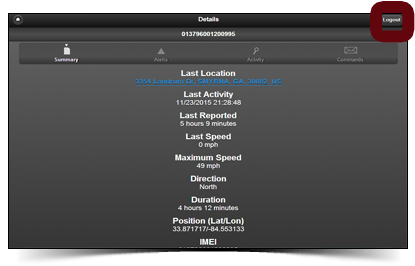
The icon in the upper right is to ‘Logout’ of the application.
Summary
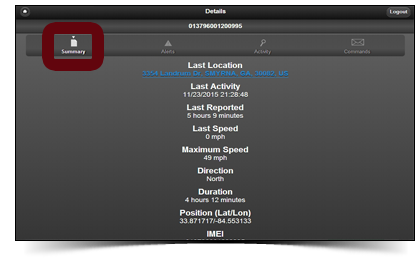
The ‘Summary’ section shows you a summary of information about where the vehicle is.
Alerts
The ‘Alerts’ section shows you alerts that have recently occurred.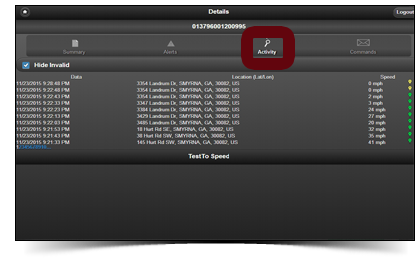
Activity
The ‘Activity’ section shows you where the vehicle has recently been and the speed driven at the time.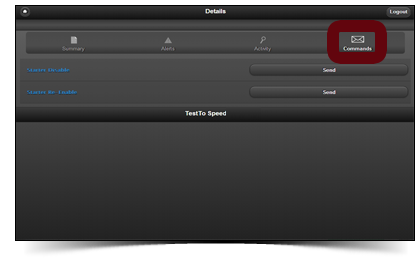
Commands
The ‘Commands’ section is to remotely Disable & Re-Enable the vehicle starter, if you have that option installed on the vehicle.Next to the command you’d like to send, click the button ‘Send’. Only 1 command can be executed per minute. So if you’d like to send another, wait at least 1 minute.
Using a Tablet Computer for Tracking
Overview
On a Tablet Computer with internet access, go to the tracking website athttps://track.alltrackusa.com/mob
(The ‘mob’ at the end is short for ‘Mobile’ tracking)
NOTE: There’s also a regular, Non-Encrypted SSL tracking website at track2.alltrackusa.com/mob
There are 2 options for logging in:
(1) Log in just like logging on with a cell phone. To do this, log on normally.
Now we’ll jump to the section of this user’s guide as though you’re using a cell phone. Click here…
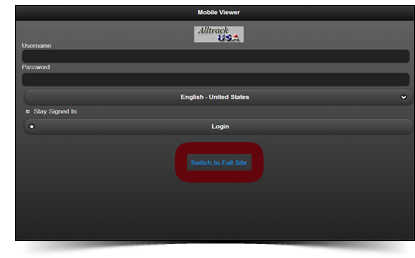
(2) Log in just like logging on with a PC. To do this, click on ‘Switch to Full Site’ for that login screen.
Log on normally.
Now we’ll jump to the section of this user’s guide as though you’re using a PC. Click here…
Change the Name of the Vehicle that appears on the map
Steps to do this:
Select ‘Dashboard’ at the menu at top
In grey box on left, click on ‘Vehicle(X)’

You’ll see a list of your vehicle(s). To Edit one, click on the Pencil icon.

At ‘Vehicle Name’ enter the name that you’d like to use.
At the lower right click ‘Save’